Step-by-Step Terrazzo Floor Restoration Guide
- michael cotto
- Nov 17, 2025
- 4 min read

Terrazzo floors are a stunning choice for any luxury home or yacht, especially here in Miami where style meets durability. Over time, though, even the most beautiful terrazzo can lose its shine and develop cracks or stains. Restoring terrazzo surfaces is a rewarding project that brings back their original elegance and extends their life. I’m excited to walk you through the process with clear, practical steps that anyone can follow.
Understanding the Basics of Restoring Terrazzo Surfaces
Before diving into the restoration, it’s important to understand what terrazzo is and why it needs special care. Terrazzo is a composite material made from chips of marble, quartz, granite, or glass set in cement or epoxy. This mix creates a smooth, durable surface that can last decades with proper maintenance.
However, terrazzo is porous and can be prone to staining, dullness, and minor cracks. Restoring it involves cleaning, repairing, grinding, polishing, and sealing. Each step is crucial to bring back that glossy, flawless finish you expect from high-end stone surfaces.
Here’s a quick overview of what you’ll need:
Protective gear (gloves, mask, goggles)
pH-neutral cleaner
Epoxy or cement patching compound
Diamond grinding pads or a terrazzo grinder
Polishing powders or compounds
Sealer designed for terrazzo
Taking your time and following each step carefully will ensure the best results.

Step 1: Cleaning and Preparing the Surface
Start by thoroughly cleaning the terrazzo floor. Use a pH-neutral cleaner to avoid damaging the surface. Avoid acidic or alkaline cleaners, as they can etch the terrazzo. Mop the floor well and let it dry completely.
Next, inspect the floor for cracks, chips, or stains. Mark these areas so you can address them in the next step. Cleaning removes dirt and grime that could interfere with repairs and polishing.
Pro tip: For stubborn stains, a poultice made from baking soda and water can help draw out discoloration without harsh chemicals.
Step 2: Repairing Cracks and Chips
Once the floor is clean and dry, it’s time to fix any damage. Small cracks and chips can be filled with an epoxy or cement-based patching compound that matches the terrazzo color. Apply the compound carefully with a putty knife, smoothing it flush with the floor surface.
Allow the patch to cure fully according to the manufacturer’s instructions. This step is essential because any unevenness will show up during grinding and polishing.
If you’re dealing with larger cracks or extensive damage, it might be best to consult a professional. Precision is key to maintaining the floor’s integrity and appearance.
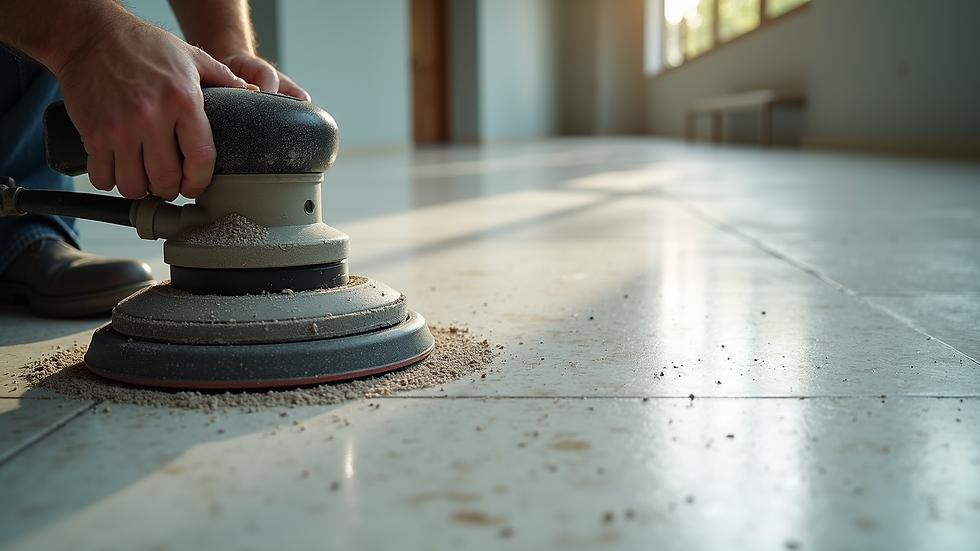
Step 3: Grinding the Terrazzo Surface
Grinding is the heart of terrazzo restoration. It removes the top layer of the floor, including scratches, stains, and old sealers, revealing fresh terrazzo underneath. You’ll need a terrazzo grinder or a floor grinder with diamond grinding pads.
Start with a coarse grit pad (around 30-50 grit) to level the surface and remove imperfections. Work in small sections, moving the grinder evenly across the floor. Keep the surface wet during grinding to reduce dust and heat buildup.
After the initial grind, switch to finer grit pads (100, 200, then 400 grit) to smooth the surface progressively. This step requires patience and attention to detail. The goal is a flat, even floor with no visible scratches.
Step 4: Polishing for a Brilliant Shine
Polishing brings out the terrazzo’s natural beauty and creates that luxurious glossy finish. Use polishing powders or compounds designed for terrazzo floors. Apply the powder with a polishing machine or a buffer fitted with a soft pad.
Work in circular motions, gradually increasing speed and pressure. The polishing process can take some time, but the results are worth it. You’ll see the floor transform from dull to dazzling.
After polishing, wipe the floor clean with a damp cloth to remove any residue.
Step 5: Sealing to Protect Your Investment
The final step is sealing the terrazzo floor. A high-quality sealer protects against stains, moisture, and wear. Choose a sealer specifically formulated for terrazzo surfaces.
Apply the sealer evenly with a mop or applicator pad. Follow the product instructions for drying times and the number of coats. Usually, two coats provide the best protection.
Sealing not only preserves the shine but also makes future cleaning easier. It’s a small step that makes a big difference in maintaining your floor’s elegance.
Keeping Your Terrazzo Floor Looking Its Best
Restoring terrazzo surfaces is a fantastic way to refresh your space, but ongoing care is just as important. Here are some tips to keep your floor looking pristine:
Clean spills immediately to prevent stains.
Use pH-neutral cleaners regularly.
Place mats at entrances to reduce dirt and grit.
Avoid dragging heavy furniture across the floor.
Schedule professional polishing every few years for a deep refresh.
If you want to skip the DIY and ensure flawless results, consider professional terrazzo floor restoration. Experts have the tools and experience to handle even the most delicate or damaged floors.
Restoring your terrazzo floor is a rewarding project that adds value and beauty to your home or yacht. With patience and the right approach, you’ll enjoy a stunning surface that lasts for years to come.


Comments